DAY 3 |
Day 3 Morning Support meeting & Afternoon Zoom Meeting on Central Dogma, Mycelium & Cells
Wednesday July 15th
- (10:00-11:30 am) Optional support discussion with BioJam Teen Mentors regarding Microbit and Makey Makey.
- (2:00-4:00pm) Engineering OF, FOR, & WITH Biology. Central dogma, genetic circuits, protein engineering.
- Maker Journal activities (pages 2, 3 & 4)
Video for Maker Journal Activities
|
|
Complete pages 2,3,& 4 of your Maker Journal.
|
Videos for Makey Makey, MicroBit and Circuitry
Exploration of Makey Makey and MicroBit.
Basic circuitry embedded in prototypes.
Basic circuitry embedded in prototypes.
|
|
|
|
|
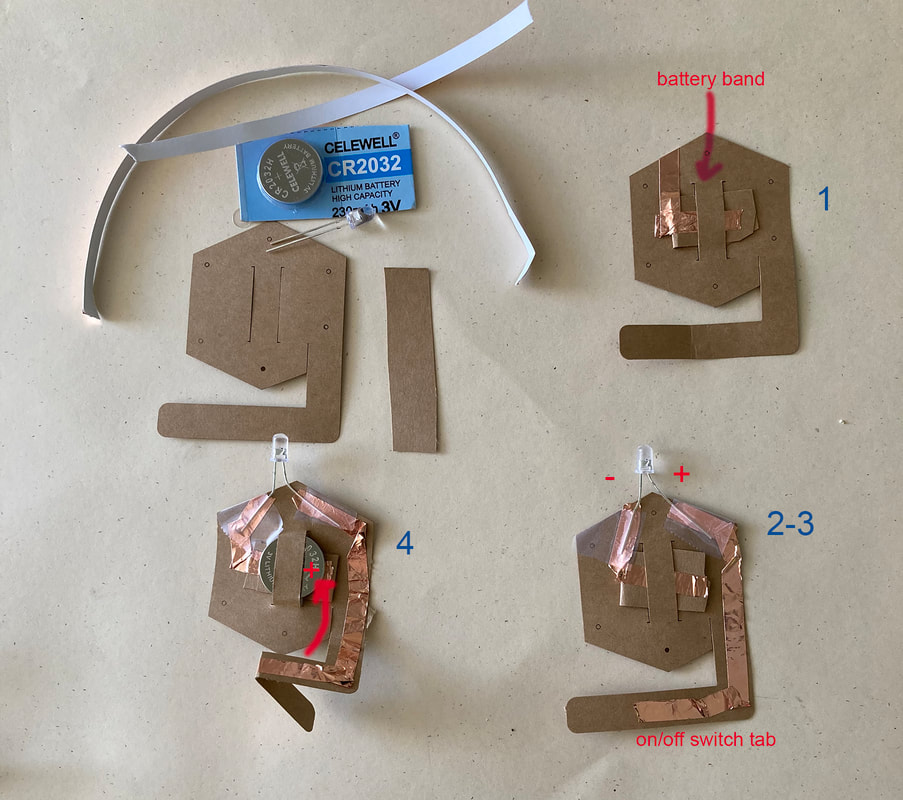
You have two sewable laser cut battery holder/switches in your kits.
MATERIALS: To set one up, you will need a 3V coin cell battery, copper tape, clear tape and one of your LED lights. STEPS: 1. cut a small strip of paper to place in battery band slot of your battery holder. This will help with adding proper pressure to your battery assembly. Take about a three inch strip of copper tape and slowly peel the backing of the tape and stick it to the paper strip insert under the battery band. Without ripping the tape, fold it upward to the top of the cardboard housing. You should have one strip of copper tape attached that looks like the letter "L". 2. Take a second strip of copper tape and slowly peel and apply to the top edge of the battery housing and peel and press down as you pull it down to the bottom of the on/off switch tab. 3. Add LED diode. The shorter diode leg is the negative leg. Tape it down on top of the copper tape on the left side of the assembly. Tape the right leg of the LED diode to the right piece of copper tape. 4. slip the battery into the battery band. Do this with the shiny positive side facing upwards. Fold the tab under so that when you slip it into the top of the belt, the copper tape touches the battery. This is your on/off switch. 5. Leave it in the off position, tab out of the belt, when not in use. You now have a light assembly which you can sew or tape into your prototypes to represent a sensor or a component of a system with feedback displays. 6. If you make any prototypes using your coin cell batteries, please photograph your circuit add the image to the Document it! slide deck. |
